If you’re following along our journey, welcome back! If you just joining us, please take a look at Episode 1 - ASP.NET with Azure Active Directory.
In this second episode we will walk through how to take an ASP.NET application and configured it for Continuous Deployment with Visual Studio Online. When we are done the application should automatically Build, run Unit Tests and Deploy to Azure either via a manual process or Continuous Deployment when we check in changes to source control.
The very first thing I like to do on any project is to take advantage of the great set of tools we have at our disposal these days. The amount of time, resources and effort this process saves is incredible. A Continuous Deployment / Release Management process should be implemented for every solution, it is the easiest way to increase value and decrease cost. Let’s jump right in!
For the following steps I’m using Visual Studio Online.
- Login to your Visual Studio Online account. Choose your project from the Recent projects & teams or click Browse.
- Once you are in the project choose the Build tab at the top of the page. The select the big green Action plus sign.
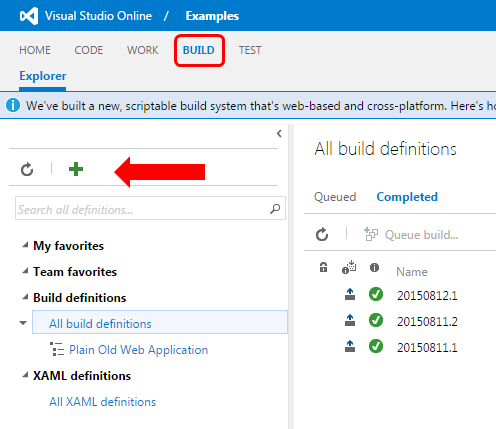
This will bring up the Definition Templates dialog.
- Select the Deployment tab and Azure Website template (shouldn’t this be Web Apps now... just saying). Click OK.

- Once in the Definitions editor I’ve gone ahead and deleted the Index Sources & Publish Symbol and Publish Build Artifacts steps, as we won’t covert these in this series. The center of your screen should look something like mine below.
- Starting at the top step Visual Studio Build click the ellipses to the right of the Solution box and select your solution file from source control. Click OK
- You can also rename this step by using the Rename blue pencil if you so desire.

- Select the Repository tab, then select the repository folder in the Mappings section

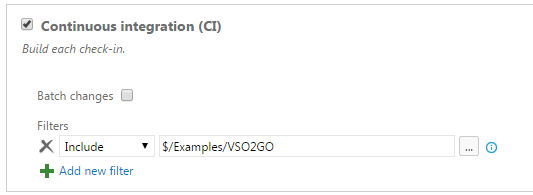
- Select the Triggers tab, then select the repository folder in the filters section. Ensure the Continuous integration (CI) checkbox is selected
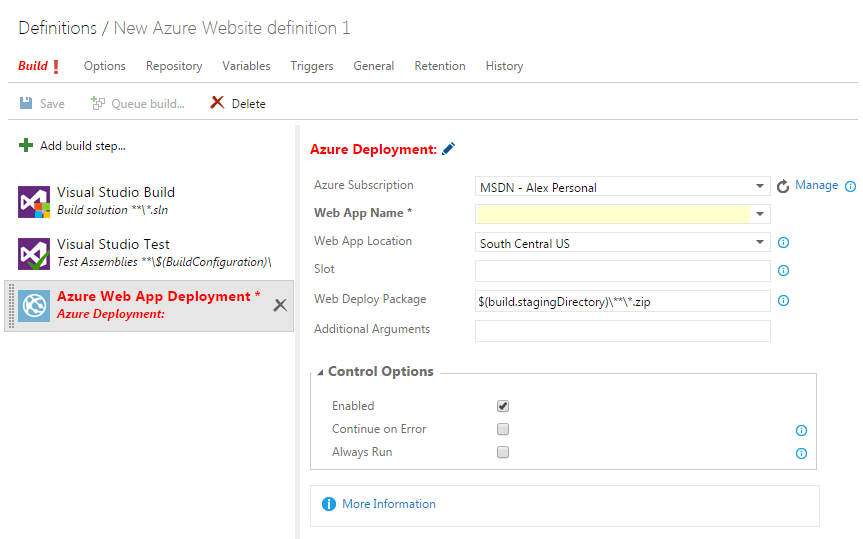
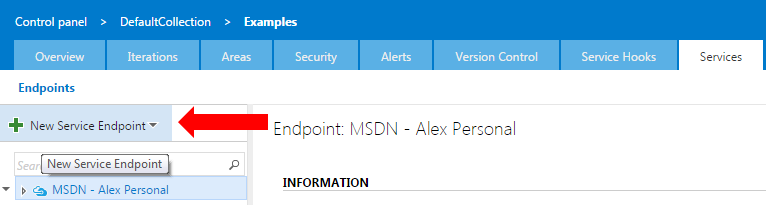
- Now go back and select the Build tab, then click the Manage link to the right of the Azure Subscription text box. This will open a separate window to register your Azure subscription as a new service endpoint in Visual Studio Online. In new window click the New Service Endpoint green plus sign and chose the Azure option.
![]()
New Window
- The Add Azure Subscription dialog will open. Fill in your Subscription Id and Subscription certificate. You can get your subscription id and certificate by using the link in the lower right corner of the dialog to download you publishsettings.xml file and opening it in notepad.
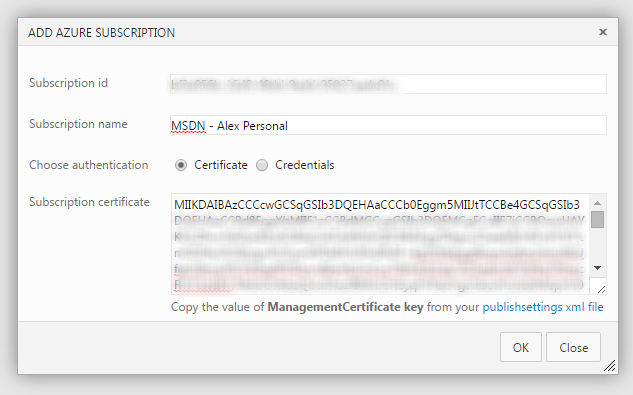
Click OK.
- Go back to the browser window that has the Build Definitions editor. Click the refresh icon next to the Azure Subscription text box. Then select the subscription just registered in the drop down. Type the name of you Web App in the Web App Name section. You will need to type the Web App name, the drop down does not currently appear to work. Select the Web App Location from the drop down. Click the Save icon in the upper right corner.

Note: All this information must match your application. If you are not sure check in the Web App section of your Azure Management portal.
![]()
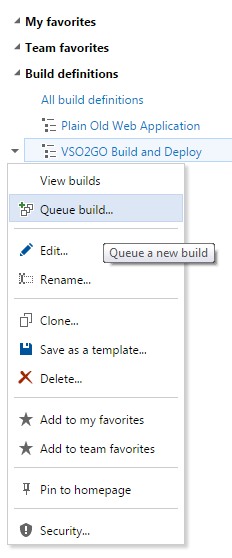
- Now we have a couple of options on how to queue a Build, Test, and Deploy. For our purpose now, we will just manually queue up a Build Test Deploy from VSO, but checking a change into source control via Visual Studio initiate the same process. Select the arrow to the left of your build name and choose Queue Build. Click OK in the Queue New Build for Project Name dialog.
The screen will automatically change. You will be able to watch the Build, Test and Deploy to Azure process. Once completed the application will be live on the URL chosen in the previous steps.
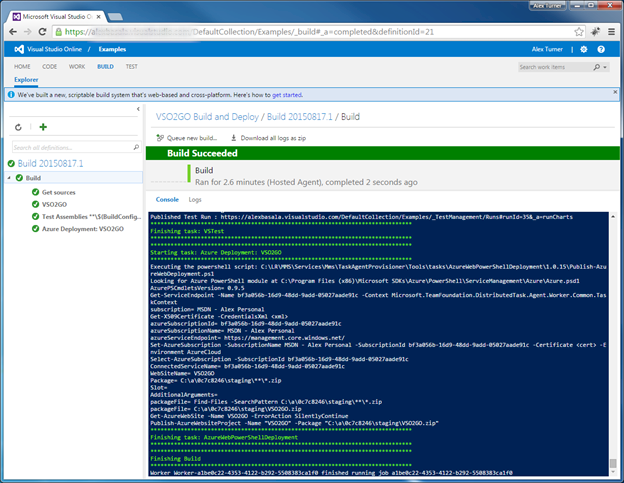
At this point I suggest looking through the log to get an idea on what is transpiring during this process. Then sit back and ponder the amount of time and headaches that can be saved by automating this process for all applications and environments from Dev, Test and Production. Hmmm…….
Watch for the upcoming Episode 3 – Going mobile with Visual Studio Online API where we turn our VSO2GO application from a basic ASP.NET to a functioning Work Item portal for Visual Studio Online.
Do you have an EA with Microsoft? You could be eligible for thousands of dollars in free ALM or Azure consulting! Contact us to learn how.