If you're using PreEmptive Analytics for Team Foundation Server or Dotfuscator and have automated builds via Team Foundation Server, you've probably thought, "I'd love to be able to have Dotfuscator run and apply instrumentation to my application after it builds!". Well, the good news is: You can! Dotfuscator actually ships with some MSBuild targets that make running Dotfuscator during the build really easy!
The only problem is that the preferred method of running builds via TFS is no longer MSBuild, but instead Windows Workflow. Luckily, it's relatively easy to combine the two.
First, you're going to need to have Dotfuscator installed on your build controller. I'm not going to cover that here; just be aware that the following steps will not work without Dotfuscator installed. Next, let's take a look at my test project:
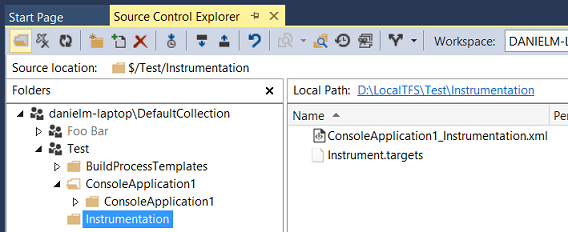
You can see that within my Team Project Test, I have two folders: ConsoleApplication1 contains my test application, and Instrumentation contains the files necessary to instrument it with Dotfuscator.
The two files in the Instrumentation folder are:
ConsoleApplication1_Instrumentation.xml -- This is the Dotfuscator project file.
Instrument.targets -- This is an MSBuild file that contains the necessary commands to actually trigger Dotfuscator during the build.
We'll be looking at both of these in a bit more detail in a moment. Let's start by opening up ConsoleApplication1_Instrumentation.xml in Dotfuscator, and looking at the Project Properties, under the Settings tab: 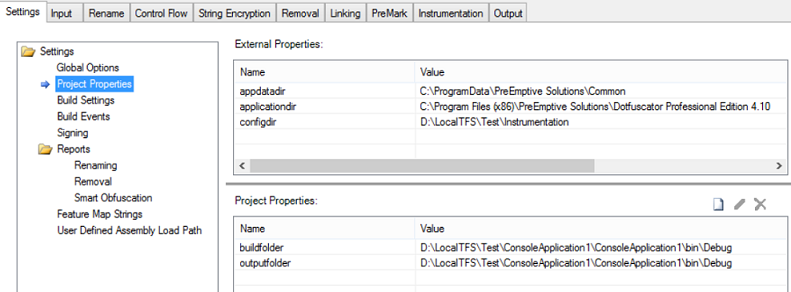
I've defined two Project Properties, buildfolder and outputfolder. These are actually variables that I can use elsewhere in my Dotfuscator project, and then override the default values of "D:\LocalTFS\...etc..." when running Dotfuscator during my build. We can see where they're used by looking at "Build Settings" and "Input": 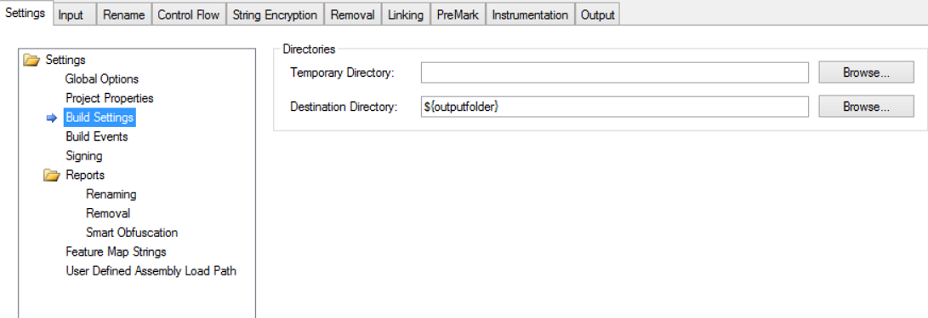
Under "Build Settings", I've set the "Destination Directory" property to be the outputfolder Project Property, so I can override the destination where my instrumented binaries get placed.
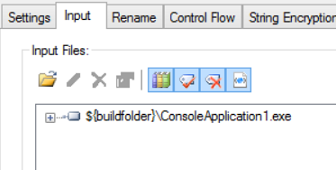
Under "Input", I've modified my assembly paths to point to the buildfolder, instead of a hard-coded path. This lets me override the location where my source binaries come from! With that done, I can now force Dotfuscator to use different values for those properties when I'm running it during my build.
The Instrumentation.targets file is pretty straightforward, with that in mind:
<Project xmlns="http://schemas.microsoft.com/developer/msbuild/2003" DefaultTargets="Instrument" ToolsVersion="3.5">
<PropertyGroup>
<DotfuscatorBinPath>$(MSBuildExtensionsPath)\PreEmptive\Dotfuscator\4.0</DotfuscatorBinPath>
<DotfuscatorDataPath>$(MSBuildExtensionsPath)\PreEmptive\Dotfuscator\4.0</DotfuscatorDataPath>
</PropertyGroup>
<PropertyGroup>
<InstrumentationProperties>
<strong> <outputfolder>$(BasePath)$(OutputFolder)</outputfolder> </strong>
<strong><buildfolder>$(BasePath)$(BuildFolder)</buildfolder></strong>
</InstrumentationProperties>
</PropertyGroup>
<!-- This targets file defines the Dotfuscate task -->
<Import Project="$(DotfuscatorDataPath)\PreEmptive.Dotfuscator.Targets" />
<!-- Explicitly invoke the Dotfuscate target from this target -->
<Target Name="Instrument">
<Dotfuscate ConfigPath="$(BasePath)\$(ConfigPath)" Properties="$(InstrumentationProperties)">
<Output TaskParameter="OutputAssemblies" ItemName="DotfuscatedAssemblies" />
</Dotfuscate>
</Target>
</Project>
The key part here is the outputfolder and buildfolder properties. The MSBuild file is relying on us to provide 4 pieces of data during our build:
- BasePath -- The base path to our current build folder
- OutputFolder -- the folder where we want to drop the instrumented binaries
- BuildFolder -- the file where the binaries we want to instrument come from
- ConfigPath -- The path to our Dotfuscator file
By proving all of those pieces of data, it can execute Dotfuscator for you! So, all that's left is just to modify our Build Process Template to support running an MSBuild task. If you're using TFS 2013, you can leverage the "Post-Build script" functionality to kick off a PowerShell script that executes the MSBuild task. I may cover that in a future blog post, but for today, I made a modification to the process template: 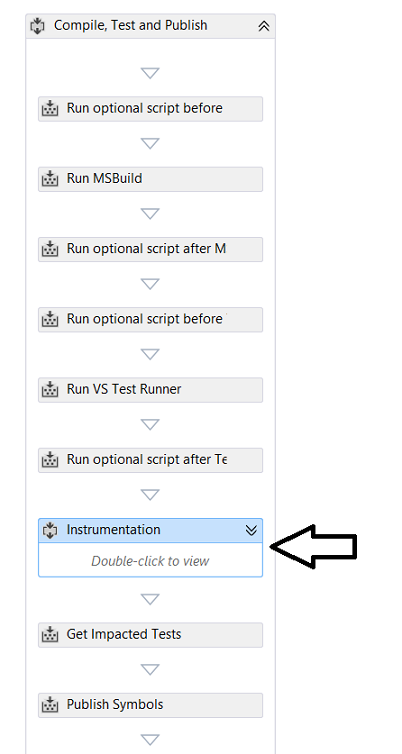
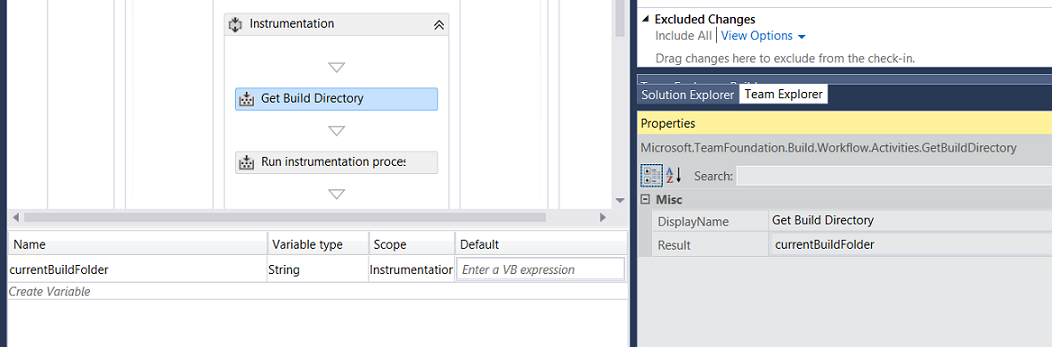
As you see, I added an "Instrumentation" sequence after the "Run optional scripts after Test" sequence. Opening up the Instrumentation sequence shows us two actions: Get Build Directory Run Instrumentation Process. The first, "Get Build Directory", just gets us the current build folder and assigns it to a local variable.
 The second, "Run Instrumetation Process", leverages the MSBuild activity:
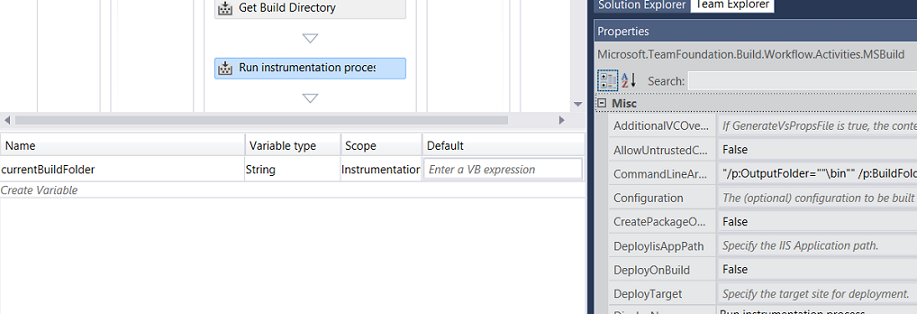
There are two important properties to set: Project should be set to:
System.IO.Path.Combine(currentBuildFolder, "src\Instrumentation\Instrument.targets")
CommandLineArguments should be set to:
"/p:OutputFolder=""\bin"" /p:BuildFolder=""\bin"" /p:ConfigPath=""src\Instrumentation\ConsoleApplication1_Instrumentation.xml"" /p:BasePath=""" + currentBuildFolder + """"
Of course, this can be expanded and modified to your heart's content -- I hard-coded a few things that could be expressed as build process template parameters. But this should be a good guide to get you headed down the right path!
Happy building!