- If and how to track changes
- Whether and how to test changes
- How to deal with problems that are discovered
- How to roll back changes when necessary
- How and when to update the version of the template
As part of our customization work, we proposed to help them reduce the complexity and overhead of maintaining their process templates by bringing modern DevOps practices to bear and automating the entire process through an Azure Pipeline based CI/CD. They were enthused.
We outlined the following basic development process – a user would make changes to the process template and commit them to the develop branch in source control. The commits would trigger a pipeline that would deploy the changes to a test project within Azure DevOps. A user would then test that the changes made within the test project to make sure that they operate satisfactorily. When all changes were done, develop would be merged with the master branch. This would trigger a deployment to Azure DevOps and replace the production process template. Now, we could (and did) add more to this process – feature branches, pull requests, etc., but this is it at its most basic. There are five main parts to the solution which I will present briefly.
- Establish source control for the process template
- Setup test environment
- Create and configure credentials
- Create the CI/CD and supporting scripts
- Automated versioning of the template
1. Template Export and Source Control Setup
To make sure that every change could be tracked, and any missteps could be rolled back, our first step was to establish revision control. Process templates export from (and import to) Azure DevOps as a zip file. When unzipped it looks like Figure 1.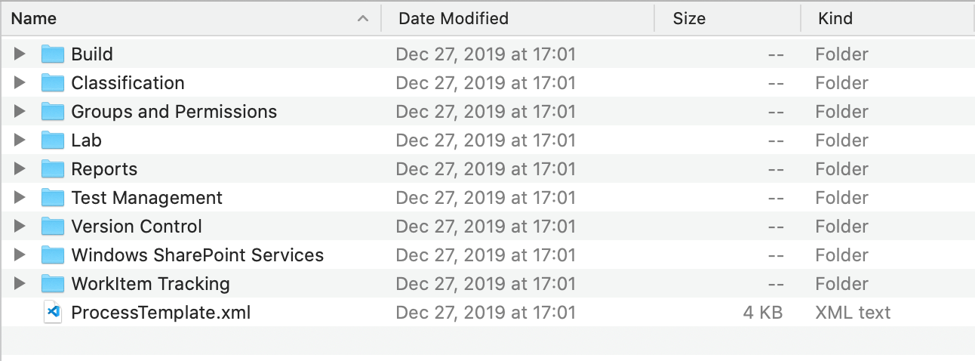
Figure 1
The process template was exported, extracted, and the contents were committed to a new Git repo that was created solely for it. The repo structure was very simple, containing two folders and three files, like Figure 2. The process-template folder contained all of the XML for the process template, the build folder contained any scripts needed for processing and deploying the process template.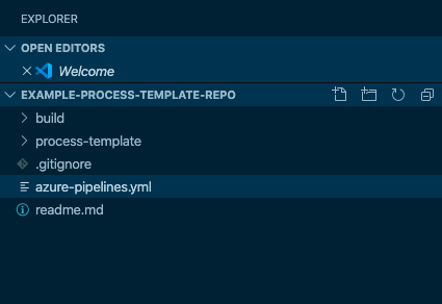 Figure 2
2. Test Environment
Once the repo was established, I set out to create the resources needed to test any changes made. In order to test template changes without overwriting the production process template, it’s necessary to first create a copy. Azure DevOps identifies a Hosted XML process using a GUID which is stored in the type attribute on the <version> element within the ProcessTemplate.xml file. When a process template is imported, Azure DevOps checks the GUID to see if this is an existing template or not. If it is existing, and the user has indicated they wish to overwrite, the process template is imported and replaces the one with the same type. If the user did not indicate they wished to overwrite, the import halts. Since I didn’t want to overwrite production, it was necessary to change the type to a different GUID. I generated a new one and replaced the value in ProcessTemplate.xml. I also modified the template name so that it would be visually distinguishable in the UI.
<?xml version="1.0" encoding="utf-8"?>
<ProcessTemplate>
<metadata>
<name>Special Agile Process - TEST</name>
<description>
This template is for teams that use Agile planning methods
</description>
<version type="11adaa22-36ed-b13f-4dfb-96870ad3e4f7" major="1" minor="0" />
Figure 3
Once these changes were made, the template was imported, and the test project was created.
3. Credentials
All calls to the Azure DevOps API must be authenticated. There are a variety of means with which to do this but the simplest is to use basic authentication using a Personal Access Token, or PAT. I am not going into creating one because Microsoft already has a great article on it.
4. CI/CD
Once source control and the test environment were set up, it was time to flesh out the deployment process. There were several things that the pipeline needed to accomplish
- Trigger when select file or folder changes were committed to specific branches
- Initialize the build environment
- Perform replacement deploying the test process
- Zip the process template for distribution
- POST the Zip file to the Azure DevOps API
- Query the Azure DevOps API for import success
Triggers
The source code in Figure 4 is an excerpt from an Azure Pipeline similar to the one I developed for the client.
trigger:
branches:
include:
- develop
- master
paths:
include:
- build/*
- azure-pipelines.yml
- process-template/*
pr:
branches:
include:
- develop
Figure 4
The trigger section along with the pr section specify what will trigger the pipeline. In this case, commits to the YAML file, or to the build or process-template directories in either the develop or master branches will trigger. Likewise, submitting a pull request to the develop branch will also trigger. By including a branch and PR trigger to develop, facilitates development both directly on develop or using feature branches like in a GitFlow scenario.
Pipeline
For my processing logic I chose PowerShell Core and psake. This was almost entirely personal preference and there is nothing to stop someone from choosing a different stack e.g., Node, Python, etc. Azure Pipelines support a huge range of technologies. The deployment process was for the most part simple. I am going to focus on two parts and gloss over the rest.
The first part I want to mention is deploying from develop. Because deployments from develop should overwrite the test version of the process template and not our production version, some replacement needs to be done. As I detailed in the Test Environment section, the type attribute of the <version /> element needs changed as well as the <name /> element. My process looked at the branch that triggered execution and if it matched develop, would replace the type and name to match the test version before the files were zipped.
The second part I want to highlight is calling the Azure DevOps API. The calls I needed to make are undocumented. Because I’ve been working with Azure DevOps for some time, I’ve learned that I can use the developer tools in the browser to peer behind the curtain. Watching network traffic, I determined there were two calls I needed to make. The first, uploaded the archive file via POST to the following URL:
The second posted an object with the GUID of the process template to query for completion of the import process:
https://dev.azure.com/{organization}/_apis/contribution/dataproviders/query
The result of this query is an object with a PercentComplete property. I wrote PowerShell to simply loop until the property read 100 (or failed a set number of times) and would either log success or log failure and the returned error message to the pipeline.
5. Versioning
When deploying modifications to the template, Microsoft states that the version number in the ProcessTemplate.xml file should be incremented. I am not a fan of version numbers within source files and certainly not trying to modify them in concert with changes. There are all sorts of technologies that do this, PowerShell module manifests, Node’s application.json, etc. I see it as an anti-pattern. To me, the version control system and deployment system should control version numbering. Instead of requiring users to modify the <version /> element in concert with other changes, I added GitVersion to the pipeline. GitVersion uses tags, commit messages, and branch information to calculate a deterministic version number i.e., given the same inputs it will always generate the same version number. It’s very flexible and can accommodate a wide range of workflows. When the pipeline executes, PowerShell queries GitVersion for the major and minor version numbers and modifies the attributes accordingly before compressing and uploading the process template. This ensures that the template is always versioned consistently.
Summary
In this post I briefly covered Azure DevOps work item process models with Hosted XML process templates in particular. I also covered some of the challenges in managing Hosted XML processes and how one can go about simplifying the process using DevOps automation. I hope it was informative.
Thank you for reading!